Description
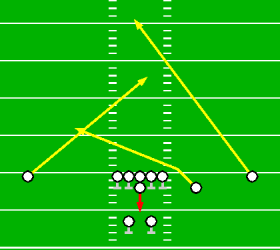
Anyone who's followed the Monstrous Madden Playbook for any length of time probably knows that I love slant patterns. Most of the time I don't even mess around starting the receiver downfield before making a break to the inside, preferring to run the slants directly off of the line of scrimmage, hitting the defense with a quick pass before they have any chance to react. I've created a fairly pass wacky slant play before in 4 Wide - Quick Slants, but Hard Slants is a little more well rounded, doing a better job of making each receiver a viable target. Slant patterns are awesome against man coverage, where the WR simply runs away from the cornerback, but I've found that Hard Slants is quite effective against most zones as well.

You might be wondering why a play built upon quick release patterns like quick slants needs two extra blockers. It probably isn't essential, and you might want to make the right RB run a swing to the right in the area cleared out by the twin receivers as a variation. However, slant patterns while quick do require sharp accuracy and very precise timing. These things are hard to achieve when a defender is running right up into your quarterback's face, so keeping both backs in to block can give the peace of mind to know you can get the snap, take an efficient three-step drop, plant, and throw without distraction. Putting one of the backs out into the pattern gives the QB an extra weapon but may allow a rushed throw in the face of a blitz that leads to a deflected pass or interception.
Although I rarely go with any modifications to the basic routes, players who like to adapt to what they see in the defense should have no problem mixing things up a bit. One thing I have found to be effective is to motion the flanker left, often clearing out the middle of the defense for the left slant. Hot reads to longer routes will likely receive double coverage, but with both backs blocking the QB should have plenty of time for these routes to develop. Out routes would work well against isolated CBs. And in case you see a likely blitz around the outside you can always motion one of the backs up to the line of scrimmage to get a jump on his block.
Player Assignments
| Position | Action |
|---|---|
| O-Line | Pass Block |
| QB | Dropback 2yd |
| Left SE | N5E6 (open) |
| Flanker | N1W1-N2W5 (open) |
| Right SE | N8W5 (open) |
| RBs | Pass Block |
See the Madden Playbook Guide for a description of these symbols.
Read Progression
- Left SE quick slant
- Right SE quick slant
- Flanker drag
- Left SE over middle
- Right SE deep middle
In the formation blurb I said this play has a great 1-2-3 read progression. Okay, so I lied, but just a bit. There are five reads listed but 90% of the time you should only need the first three. The later reads are just in case the primaries are covered, which is a possibility with only three WRs in the pattern. If this happens your best bet may be to buy time from your blocking RBs and use the Playmaker to motion receivers to an open spot. Otherwise the drag pattern usually makes the best late option if everything else breaks down. The QB may need to buy a bit of time with his feet, then throw back across his body over to the left, putting a lot of air under the ball to get it over the linebackers. In a few cases the slants may draw the safeties in and the WR can turn up the sidelines for a nice 15+ yard gain.
While the left slant is my favorite, it's the right slant that probably has the best big play capabilities. If the strong safety steps forward or outwards at the snap a slightly later than usual throw to the right SE may split the safeties and go the distance. Executed just right this play looks too easy and will leave defenders scratching their heads wondering what just happened. This takes some practice though, and for the most part the best bet is simply to take the first available option and gain and easy 6-12 yards.
Analysis
Pros:
- Left SE shallow slant makes for impossible coverages for isolated CB
- Picks up blitzes easily
- Quick execution and easy read progression
Cons:
- Press coverage may force QB to settle for drag pattern for short gain
- Can be difficult to find late options if initial reads are covered
Contact Arkaein with any comments or questions regarding the Monstrous Madden Playbook.