Description
4-3 Barricade plays tend to be naturally tough against inside runs due to the tight linebacker arrangement, but sometime just having players lined up in the right position isn't enough. Plugger takes things a bit further and sends the middle LB blitzing right towards the center, taking away any opportunity for the interior offensive lineman to attempt a double team, forcing lead blocks to engage in the backfield hopefully causing things to jam up and suffocating intended running lanes. The OLBs hand back in hook zones, so delay tactics by the offense should also be ineffective in drawing the `backers away from the point of attack.
As well as being tough against runs up the middle, Plugger is solid against passes down the middle. The hook zones prevent the most common form of blitz exploitation: throwing in the direction of the blitz. The area the MLB shoots from will be anything but vacant, with the short middle and slot seams well covered, meaning the QB will most likely be forced to look to his secondary hot routes if the pressure is effective. The weakness of this coverage is to the outsides. While drag and slant routes should be stopped RB swings can be deadly, especially if the split WRs take the cornerbacks deep. Playing press coverage might help take RB flats and swing routes away, and might be suitable if you're the gambling type, but a WR who gets by the press will be wide open down the sideline with only a safety to beat deep.
Though stuffing the middle is its specialty, Plugger is fairly effective against most other runs as well, due to the inside technique of the CBs and short LB stances. Something to watch out for though is an opponent with a good run blocking tight end. If the TE can block down to seal the OLB to the inside an off tackle run could get by the LBs completely while staying inside of the CB, forcing the safety to make a saving tackle.
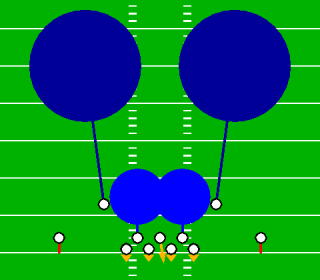
Player Assignments
| Position | Action |
|---|---|
| D-Line | Base |
| ROLB | Hook Zone |
| MLB | Blitz Middle |
| LOLB | Hook Zone |
| Right CB (CB #2) | Man WR2 |
| Left CB (CB #1) | Man WR1 |
| SS and FS | Deep Zone |
See the Madden Playbook Guide for a description of these symbols.
Analysis
Pros:
- Very good at stopping inside runs, especially between the guards
- Unlike many blitzes has solid pass defense in area blitzer comes from (short middle zone)
- Can force QBs to scramble out of pocket
Cons:
- Poor sideline pass defense
- Vulnerable to RB flats and swing passes
- Strong run blocking TEs can trap OLBs to inside, allowing strong off tackle runs
Contact Arkaein with any comments or questions regarding the Monstrous Madden Playbook.