Description
4-3 Barricade was designed to be tough up the middle. If your opponent catches onto this fact and starts attacking the outsides then Zone Roller may be an excellent counter. This full zone coverage play concentrates on moving defenders out to the flats and sidelines to reverse the normal tendencies of the formation. A quarterback expecting his receiver to have a free release to the sidelines may be very disappointed to see the defensive back lurking in zone, ready to pick his pass off and take it the other way.
While most 4-3 Barricade are naturally tough against inside runs, this play eliminates the potential weakness against outside runs by sliding a linebacker and safety outside and employing double flats zone coverage. The zone coverage is especially tough to the defense's right side. The real strength of Zone Roller though is my rolling zone coverage technique pioneered in Spin Zone and used in a few other plays since. It is especially potent on the defense's left side where the LOLB slides out, the CB slides back, and the strong safety slides in and up into deep zone. The moving coverages create sliding windows of opportunity for passes that are difficult to predict in the space of a few seconds. A bad assessment may lead to an INT for your defense.
Zone Roller does have one pretty serious passing vulnerability that needs to be brought up. If you use the play wisely, however, you may be able to disguise the hole so that your opponent never realizes it is there. The problem is that the SS has a long distance to cover to get to his deep zone area across the field, while the free safety doesn't get a lot of depth on his curl zone coverage. The result is that an uninterrupted streak pattern down the left sideline will be wide open for a long, easy TD. The plus side is that with the CB in flats zone and the FS in curl zone directly over the top of him the play will look well covered for about the first 2 seconds after the snap. You shouldn't need to cover for much more time than that as the ROLB blitz should provide enough pressure to prevent the QB from holding the ball for too long. As long as the play is not overused this weakness may go unnoticed. Make sure you know whether your opponent runs a lot of streaks before using, though. This vulnerability can be neutralized by taking manual control of either safety and adding depth or sprint speed to the coverage, using the play only in the red zone, or possibly by pressing the left WR at the line of scrimmage.
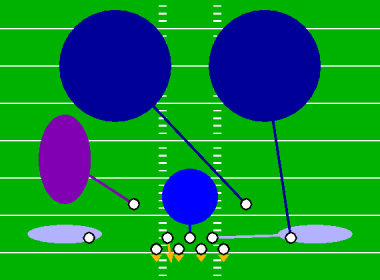
Player Assignments
| Position | Action |
|---|---|
| D-Line | Base |
| ROLB | Blitz Middle |
| MLB | Hook Zone |
| LOLB | Flats Zone Left |
| Right CB (CB #2) | Flats Zone Right |
| Left CB (CB #1) | Deep Zone |
| SS | Deep Zone |
| FS | Curl Zone Right |
See the Madden Playbook Guide for a description of these symbols.
Analysis
Pros:
- Strong against runs and passes to the outside
- Reverses major tendencies of the 4-3 Barricade formation, possibly baiting opponents into bad play calls
- Good pressure with blitzing LB combined with solid containment across line of scrimmage
Cons:
- SS starting far from final zone coverage position can give up easy bombs
- Somewhat light coverage on defense's left side
Contact Arkaein with any comments or questions regarding the Monstrous Madden Playbook.