Description
I really like screen passes as they fit well with my pseudo-West Coast offense philosophy. However, making them work effectively in Madden is far from easy. While most of the game mechanics in the recent editions of Madden are quite excellent, screen plays require different types of blocking and defensive recognition that aren't as well implemented. Additionally, some of the built in screen plays utilize blocks not available to custom plays. Funnel Screen was one of my first successful screen pass plays which utilized the offensive linemen effectively. Soon after I developed the Wyvern formation I saw the potential of an even better screen play using the trips receivers as a wall of blockers. This play, simply named HB Screen, is the result. It's a play that I think you'll have a lot of fun with because while it's both easy to execute and quite effective, with practice and experience you should learn how to improve the gains you achieve against a variety of defensive formations and coverages, and be able to take advantage of it's great flexibility compared to most other screen passes.
I developed this as one of my earliest Wyvern plays, and so I've known through plenty of game experience that it's effective against a variety of defenses and in a lot of situations, but the more thorough analysis I did for this write-up revealed some characteristics that made the play seem even nicer than I originally thought. Normally I test offensive plays against primarily the defensive formation that seems to offer the best matchup. With four wide receivers in Wyvern this would normally be Dime. Usually if a pass play works against Dime it will work against Nickel and base sets as well. Screen passes are a little different though, and because I run Wyvern plays on normal first and second downs as much as obvious passing situations I thought I should test it against all three basic sets. I observed some nice patterns that I think will help you really get the most out of this play.
The most important observation is that this play can have at least some effectiveness (i.e. has a good chance to gain a solid 5 yards) against just about every basic coverage scheme in any of the three basic formations (4-3, Nickel and Dime). Some defenses are tougher than others though, and the key to success is to recognize the formation before the play and the coverage immediately after the snap and adjust the timing and force of the throw accordingly. Against man coverage each blocking receiver will be directly engaged with a defender so there probably won't be anyone too close to the halfback immediately. This means that it's best to let the receivers get in position and let the rush come upfield before making a nice easy throw to the HB. With most of the defenders lined up to the left (screen) side the HB should take the pass immediately to the outside and run down the sideline. Not too many chances to weave back and forth here. This really requires a good initial block by at least two of your trips receivers to break a big gain, and favors matchups against DB heavy Nickel or Dime rather than base sets with bigger linebackers to block.
Against zones things open up more. The DBs won't be stacked on the screen side, so the WR blocking should overwhelm the defense early and there should be more room for the HB to cut and juke. In this case throw the ball a little earlier, before the WRs break off their routes to block, while the DBs are still dropping back into coverage. Things tighten up a bit against Cover 2 with outside press coverage, especially against Nickel or Dime. Here just throw quick and sprint to the outside, hoping you can elude one defender to gain a solid 5 yards. Things are a little better against base sets where the press corner is fairly isolated, here let the CB come down and in, throwing later so that the HB can just outrun the LBs and the WRs can block on the safeties downfield.
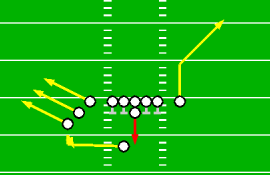
Player Assignments
| Position | Action |
|---|---|
| O-Line | Pass Block |
| QB | Dropback 3yd |
| Trips WRs | N1W2 (delay 2 sec)-(open) |
| RB | Screen Left |
| Right SE | 5yd Corner |
See the Madden Playbook Guide for a description of these symbols.
Read Progression
- HB Screen
- Right SE corner or hot read
- Left outside flanker delay
- Left inside flanker delay
- Left SE delay
Being a screen pass there's not really much to look at. The HB is the primary target and should be the recipient of 90% of the throws in this play. The other reads are just in case the play breaks down because the screen is smothered. Fortunately, all of the offensive linemen perform standard pass blocking so the QB should have time to look at secondary options if he needs to. The right split ends runs a corner route but I like a Playmaker quick out against man coverage. One of the trips receivers is probably uncovered for a short gain against most zones.
Analysis
Pros:
- Can be very effective against base, Nickel and Dime packages
- Has decent potential against almost all coverages if the QB is able to recognize the coverage and adjust the timing and velocity of the screen pass accordingly
- With good blocking WRs has a chance for big gains every time
- Because all of the blocking is provided by the WRs the QB gets a natural pocket to work from, giving him time to find a secondary target if the screen is smothered
Cons:
- Risk of fumble rather than ordinary incomplete pass if screen pass is hurried or timed badly
- Requires excellent assessment of defenses before and immediately after the snap to time the throw for maximum effectiveness, and can be a bit unpredictable against blitzes
- May be less effective when run close to the sideline
Contact Arkaein with any comments or questions regarding the Monstrous Madden Playbook.