Description
Flood Zone is another oldie but goodie in my personal collection that I just had to share. Originally intended as a general purpose, blanket coverage pass defense, I quickly concluded that while it was unsuitable for that task it excels at red zone pass defense. When I'm on defense, ball inside my 15 yard line and the offense has 3rd and at least 7 or 8 yards to go this play is far and away my favorite call. While only 3 rushers put very little pressure on the QB, the remaining 15-25 yards of the field (including the end zone) are absolutely swarming with defensive backs. It's not invincible, but most of the time my defense forces a deflection or drive killing interception, or if my opponent plays it safe a dumpoff underneath the coverage for a minimal gain.
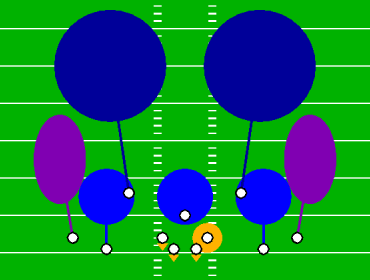
Because the zone coverages available in Madden are limited (and because no coverage is perfect of course) there are a few gaps in Flood Zone that can be exploited if some precautions are not made. When this play is used in the red zone these gaps shrink the closer the ball starts to the goal line. The most significant gap is probably right over the head of the rover (the 3rd safety right in the middle of the formation). Both safeties play deep zone, but even in the end zone this is a fair amount of real estate to cover, often leaving a gap in the deep middle. To remedy this I usually take manual control of the rover and add about 2-3 yards to the standard hook zone drop. This puts a lot of pressure on this position though, as you have to be able to slide from side to side without over-committing to a single receiver running across the field, get enough depth to prevent the lob over the middle while staying shallow enough to prevent easy completions underneath, and have good enough reactions to make successful plays on throws in the rover's direction (which Madden 2005's defensive enhancements thankfully make much easier). Another way to shore up the medium deep middle is to slide the slot cornerbacks in and back a few yards before the snap, though this may not help much if the QB holds the ball for long.
There are a few other things to watch out for. Although the curls zones with safeties in deep zone over the top makes throws to the deep corners very difficult, the lack of flats zone coverage will allow some easy completions on RB swing and flats routes and quick out routes. These receivers will usually be tackled quickly, but not until precious red zone real estate is surrendered. Flood Zone is also a risky call on early downs because an audible to a simple dive play will often pick up an easy 5 or more yards, even out of spread formations. Fortunately, outside runs as well as QB scrambles are well contained by the spread zone coverage.
Player Assignments
| Position | Action |
|---|---|
| RE, LE and ROLB | Base |
| LOLB | QB Spy |
| Right Outside CB (CB #2) | Curl Zone Right |
| Right and Left Slot CBs (CB #3 and CB #4) | Hook Zone |
| Left Outside CB (CB #1) | Curl Zone Left |
| Rover (SS #2) | Hook Zone |
| SS and FS | Deep Zone |
See the Madden Playbook Guide for a description of these symbols.
Analysis
Pros:
- Great red zone pass defense capable of creating easy INTs in end zone
- Effective against outside running plays
- Max zone coverage + QB spy will prevent long QB scrambles
Cons:
- Very little pressure, QB will have time in pocket
- No flats coverage, RBs can catch late passes around goal line when WR routes pull DBs to back of end zone
- With only 2 safeties deep play is dangerous to run in open field
- Can give up easy gains by running up the middle
Contact Arkaein with any comments or questions regarding the Monstrous Madden Playbook.