Description
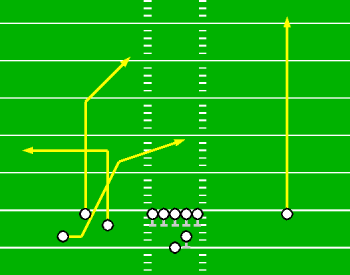
Deep Drag features multiple crossing routes designed to free up the left flankers underneath the coverage, hopefully loosing their defenders in the confusion. This works best against man coverage because the defensive backs end up chasing the receivers sideways across the field. Even against zone, the deep routes should draw enough coverage to open up the drag route across the middle. Because of the ease in reading and making this throw, this is one of my favorite plays for must have 1st down conversions.

This deep drag route is the primary target. Coming all the way across from the left side, the flanker is almost sure to get good separation from a corner in man coverage. This makes for an easy throw for a good 10-12 yard gain. The key is timing the throw to hit between any linebackers in coverage, usually just after the right hash marks. The out pattern run by the other flanker is a nice second option, though the sideline can make it tight, especially if the play starts on the left hash marks. In this case you need almost perfect timing, with a hard throw right as the receiver breaks.
One potential drawback to this play is that a human could probably learn to defend the drag pretty well after being stung by it a few times. The counter to this is that I have a wide selection of Tsunami plays, all of which are confusing and are hard for defenses to assess quickly. Look for more Tsunami plays in the next few weeks!
Player Assignments
| Position | Action |
|---|---|
| O-Line | Pass Block |
| QB | Receive Shotgun Snap |
| RB | Pass Block |
| Left Outside Flanker | E1-N4E2-N1E3 (open) |
| Left SE | 15yd Post |
| Left Inside Flanker | 10yd Out |
| Right SE | 25yd Streak |
See the Madden Playbook Guide for a description of these symbols.
Read Progression
- Right SE streak
- Left outside flanker deep drag
- Left inside flanker out
- Left SE post
Analysis
Pros:
- Flanker drag pattern gets open easily and is an easy throw, just need to find a window between any linebackers in coverage
- Out pattern gives play two solid routes for possible 10 yard gains
- Streak and post pattern, though mainly to draw coverage, give big play potential if needed
Cons:
- A little slow developing, the RB stays in to block but the QB may have to buy a little time with his feet
- Hard to hit the out pattern in bounds if the play starts on the left hash marks
- No easy dump-off route if pressured quickly
Contact Arkaein with any comments or questions regarding the Monstrous Madden Playbook.